Recipes
The following recipes demonstrate some of the capabilities of the gpiozero library. Please note that all recipes are written assuming Python 3. Recipes may work under Python 2, but no guarantees!
Pin Numbering
This library uses Broadcom (BCM) pin numbering for the GPIO pins, as opposed to physical (BOARD) numbering. Unlike in the RPi.GPIO library, this is not configurable.
Any pin marked GPIO in the diagram below can be used for generic
components:

LED
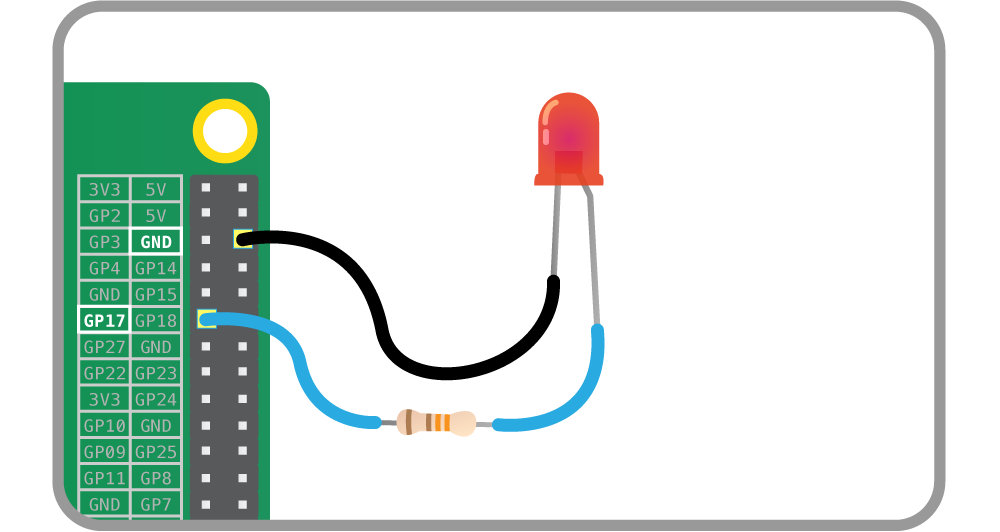
Turn an LED on and off repeatedly:
from gpiozero import LED
from time import sleep

red = LED(17)

while True:
    red.on()
    sleep(1)
    red.off()
    sleep(1)
Alternatively:
from gpiozero import LED
from signal import pause

red = LED(17)

red.blink()

pause()
Note
Reaching the end of a Python script will terminate the process and GPIOs
may be reset. Keep your script alive with signal.pause(). See
Keep your script running for more information.
Button
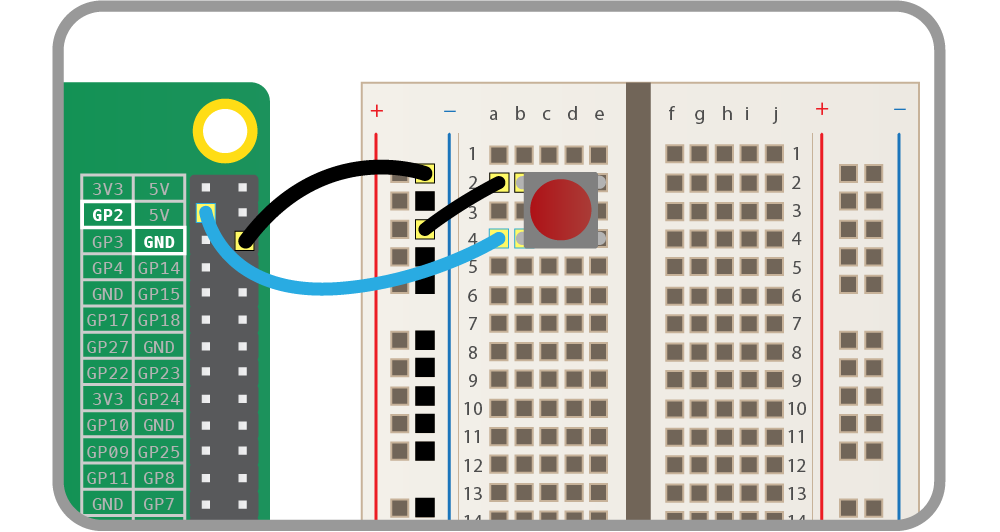
Check if a Button is pressed:
from gpiozero import Button

button = Button(2)

while True:
    if button.is_pressed:
        print("Button is pressed")
    else:
        print("Button is not pressed")
Wait for a button to be pressed before continuing:
from gpiozero import Button

button = Button(2)

button.wait_for_press()
print("Button was pressed")
Run a function every time the button is pressed:
from gpiozero import Button
from signal import pause

def say_hello():
    print("Hello!")

button = Button(2)

button.when_pressed = say_hello

pause()
Button controlled LED

Turn on an LED when a Button is pressed:
from gpiozero import LED, Button
from signal import pause

led = LED(17)
button = Button(2)

button.when_pressed = led.on
button.when_released = led.off

pause()
Alternatively:
from gpiozero import LED, Button
from signal import pause

led = LED(17)
button = Button(2)

led.source = button.values

pause()
Traffic Lights

A full traffic lights system.
Using a TrafficLights kit like Pi-Stop:
from gpiozero import TrafficLights
from time import sleep

lights = TrafficLights(2, 3, 4)

lights.green.on()

while True:
    sleep(10)
    lights.green.off()
    lights.amber.on()
    sleep(1)
    lights.amber.off()
    lights.red.on()
    sleep(10)
    lights.amber.on()
    sleep(1)
    lights.green.on()
    lights.amber.off()
    lights.red.off()
Alternatively:
from gpiozero import TrafficLights
from time import sleep
from signal import pause

lights = TrafficLights(2, 3, 4)

def traffic_light_sequence():
    while True:
        yield (0, 0, 1) # green
        sleep(10)
        yield (0, 1, 0) # amber
        sleep(1)
        yield (1, 0, 0) # red
        sleep(10)
        yield (1, 1, 0) # red+amber
        sleep(1)

lights.source = traffic_light_sequence()

pause()
Using LED components:
from gpiozero import LED
from time import sleep

red = LED(2)
amber = LED(3)
green = LED(4)

green.on()
amber.off()
red.off()

while True:
    sleep(10)
    green.off()
    amber.on()
    sleep(1)
    amber.off()
    red.on()
    sleep(10)
    amber.on()
    sleep(1)
    green.on()
    amber.off()
    red.off()
Push button stop motion
Capture a picture with the camera module every time a button is pressed:
from gpiozero import Button
from picamera import PiCamera

button = Button(2)

with PiCamera() as camera:
    camera.start_preview()
    frame = 1
    while True:
        button.wait_for_press()
        camera.capture('/home/pi/frame%03d.jpg' % frame)
        frame += 1
See Push Button Stop Motion for a full resource.
Reaction Game

When you see the light come on, the first person to press their button wins!
from gpiozero import Button, LED
from time import sleep
import random

led = LED(17)

player_1 = Button(2)
player_2 = Button(3)

time = random.uniform(5, 10)
sleep(time)
led.on()

while True:
    if player_1.is_pressed:
        print("Player 1 wins!")
        break
    if player_2.is_pressed:
        print("Player 2 wins!")
        break

led.off()
See Quick Reaction Game for a full resource.
GPIO Music Box
Each button plays a different sound!
from gpiozero import Button
import pygame.mixer
from pygame.mixer import Sound
from signal import pause

pygame.mixer.init()

sound_pins = {
    2: Sound("samples/drum_tom_mid_hard.wav"),
    3: Sound("samples/drum_cymbal_open.wav"),
}

buttons = [Button(pin) for pin in sound_pins]
for button in buttons:
    sound = sound_pins[button.pin.number]
    button.when_pressed = sound.play

pause()
See GPIO Music Box for a full resource.
All on when pressed
While the button is pressed down, the buzzer and all the lights come on.
from gpiozero import FishDish
from signal import pause

fish = FishDish()

fish.button.when_pressed = fish.on
fish.button.when_released = fish.off

pause()
Ryanteck TrafficHat:
from gpiozero import TrafficHat
from signal import pause

th = TrafficHat()

th.button.when_pressed = th.on
th.button.when_released = th.off

pause()
Using LED, Buzzer, and Button components:
from gpiozero import LED, Buzzer, Button
from signal import pause

button = Button(2)
buzzer = Buzzer(3)
red = LED(4)
amber = LED(5)
green = LED(6)

things = [red, amber, green, buzzer]

def things_on():
    for thing in things:
        thing.on()

def things_off():
    for thing in things:
        thing.off()

button.when_pressed = things_on
button.when_released = things_off

pause()
RGB LED

Making colours with an RGBLED:
from gpiozero import RGBLED
from time import sleep

led = RGBLED(red=9, green=10, blue=11)

led.red = 1  # full red
sleep(1)
led.red = 0.5  # half red
sleep(1)

led.color = (0, 1, 0)  # full green
sleep(1)
led.color = (1, 0, 1)  # magenta
sleep(1)
led.color = (1, 1, 0)  # yellow
sleep(1)
led.color = (0, 1, 1)  # cyan
sleep(1)
led.color = (1, 1, 1)  # white
sleep(1)

led.color = (0, 0, 0)  # off
sleep(1)

# slowly increase intensity of blue
for n in range(100):
    led.blue = n/100
    sleep(0.1)
Motion sensor

Light an LED when a MotionSensor detects motion:
from gpiozero import MotionSensor, LED
from signal import pause

pir = MotionSensor(4)
led = LED(16)

pir.when_motion = led.on
pir.when_no_motion = led.off

pause()
Light sensor

Have a LightSensor detect light and dark:
from gpiozero import LightSensor

sensor = LightSensor(18)

while True:
    sensor.wait_for_light()
    print("It's light! :)")
    sensor.wait_for_dark()
    print("It's dark :(")
Run a function when the light changes:
from gpiozero import LightSensor, LED
from signal import pause

sensor = LightSensor(18)
led = LED(16)

sensor.when_dark = led.on
sensor.when_light = led.off

pause()
Or make a PWMLED change brightness according to the detected light
level:
from gpiozero import LightSensor, LED
from signal import pause

sensor = LightSensor(18)
led = PWMLED(16)

led.source = sensor.values

pause()
Distance sensor
Have a DistanceSensor detect the distance to the nearest object:
from gpiozero import DistanceSensor
from time import sleep

sensor = DistanceSensor(23, 24)

while True:
    print('Distance to nearest object is', sensor.distance, 'm')
    sleep(1)
Run a function when something gets near the sensor:
from gpiozero import DistanceSensor, LED
from signal import pause

sensor = DistanceSensor(23, 24, max_distance=1, threshold_distance=0.2)
led = LED(16)

sensor.when_in_range = led.on
sensor.when_out_of_range = led.off

pause()
Motors

Spin a Motor around forwards and backwards:
from gpiozero import Motor
from time import sleep

motor = Motor(forward=4, back=14)

while True:
    motor.forward()
    sleep(5)
    motor.backward()
    sleep(5)
Robot
Make a Robot drive around in (roughly) a square:
from gpiozero import Robot
from time import sleep

robot = Robot(left=(4, 14), right=(17, 18))

for i in range(4):
    robot.forward()
    sleep(10)
    robot.right()
    sleep(1)
Make a robot with a distance sensor that runs away when things get within 20cm of it:
from gpiozero import Robot, DistanceSensor
from signal import pause

sensor = DistanceSensor(23, 24, max_distance=1, threshold_distance=0.2)
robot = Robot(left=(4, 14), right=(17, 18))

sensor.when_in_range = robot.backward
sensor.when_out_of_range = robot.stop
pause()
Button controlled robot
Use four GPIO buttons as forward/back/left/right controls for a robot:
from gpiozero import RyanteckRobot, Button
from signal import pause

robot = RyanteckRobot()

left = Button(26)
right = Button(16)
fw = Button(21)
bw = Button(20)

fw.when_pressed = robot.forward
fw.when_released = robot.stop

left.when_pressed = robot.left
left.when_released = robot.stop

right.when_pressed = robot.right
right.when_released = robot.stop

bw.when_pressed = robot.backward
bw.when_released = robot.stop

pause()
Keyboard controlled robot
Use up/down/left/right keys to control a robot:
import curses
from gpiozero import RyanteckRobot

robot = RyanteckRobot()

actions = {
    curses.KEY_UP:    robot.forward,
    curses.KEY_DOWN:  robot.backward,
    curses.KEY_LEFT:  robot.left,
    curses.KEY_RIGHT: robot.right,
    }

def main(window):
    next_key = None
    while True:
        curses.halfdelay(1)
        if next_key is None:
            key = window.getch()
        else:
            key = next_key
            next_key = None
        if key != -1:
            # KEY DOWN
            curses.halfdelay(3)
            action = actions.get(key)
            if action is not None:
                action()
            next_key = key
            while next_key == key:
                next_key = window.getch()
            # KEY UP
            robot.stop()

curses.wrapper(main)
Note
This recipe uses the curses module. This module requires that Python is
running in a terminal in order to work correctly, hence this recipe will
not work in environments like IDLE.
If you prefer a version that works under IDLE, the following recipe should
suffice, but will require that you install the evdev library with sudo pip
install evdev first:
from gpiozero import RyanteckRobot
from evdev import InputDevice, list_devices, ecodes

robot = RyanteckRobot()

devices = [InputDevice(device) for device in list_devices()]
keyboard = devices[0]  # this may vary

keypress_actions = {
    ecodes.KEY_UP: robot.forward,
    ecodes.KEY_DOWN: robot.backward,
    ecodes.KEY_LEFT: robot.left,
    ecodes.KEY_RIGHT: robot.right,
}

for event in keyboard.read_loop():
    if event.type == ecodes.EV_KEY:
        if event.value == 1:  # key down
            keypress_actions[event.code]()
        if event.value == 0:  # key up
            robot.stop()
Motion sensor robot
Make a robot drive forward when it detects motion:
from gpiozero import Robot, MotionSensor
from signal import pause

robot = Robot(left=(4, 14), right=(17, 18))
pir = MotionSensor(5)

pir.when_motion = robot.forward
pir.when_no_motion = robot.stop

pause()
Alternatively:
from gpiozero import Robot, MotionSensor
from signal import pause

robot = Robot(left=(4, 14), right=(17, 18))
pir = MotionSensor(5)

robot.source = zip(pir.values, pir.values)

pause()
Potentiometer

Continually print the value of a potentiometer (values between 0 and 1)
connected to a MCP3008 analog to digital converter:
from gpiozero import MCP3008

while True:
    with MCP3008(channel=0) as pot:
        print(pot.value)
Present the value of a potentiometer on an LED bar graph using PWM to represent states that won’t “fill” an LED:
from gpiozero import LEDBarGraph, MCP3008
from signal import pause

graph = LEDBarGraph(5, 6, 13, 19, 26, pwm=True)
pot = MCP3008(channel=0)
graph.source = pot.values
pause()
Measure temperature with an ADC
Wire a TMP36 temperature sensor to the first channel of an MCP3008
analog to digital converter:
from gpiozero import MCP3008
from time import sleep

def convert_temp(gen):
    for value in gen:
        yield (value * 3.3 - 0.5) * 100

adc = MCP3008(channel=0)

for temp in convert_temp(adc.values):
    print('The temperature is', temp, 'C')
    sleep(1)
Full color LED controlled by 3 potentiometers
Wire up three potentiometers (for red, green and blue) and use each of their values to make up the colour of the LED:
from gpiozero import RGBLED, MCP3008

led = RGBLED(red=2, green=3, blue=4)
red_pot = MCP3008(channel=0)
green_pot = MCP3008(channel=1)
blue_pot = MCP3008(channel=2)

while True:
    led.red = red_pot.value
    led.green = green_pot.value
    led.blue = blue_pot.value
Alternatively, the following example is identical, but uses the
source property rather than a while loop:
from gpiozero import RGBLED, MCP3008
from signal import pause

led = RGBLED(2, 3, 4)
red_pot = MCP3008(0)
green_pot = MCP3008(1)
blue_pot = MCP3008(2)

led.source = zip(red_pot.values, green_pot.values, blue_pot.values)

pause()
Please note the example above requires Python 3. In Python 2, zip()
doesn’t support lazy evaluation so the script will simply hang.
Controlling the Pi’s own LEDs
On certain models of Pi (specifically the model A+, B+, and 2B) it’s possible to control the power and activity LEDs. This can be useful for testing GPIO functionality without the need to wire up your own LEDs (also useful because the power and activity LEDs are “known good”).
Firstly you need to disable the usual triggers for the built-in LEDs. This can be done from the terminal with the following commands:
$ echo none | sudo tee /sys/class/leds/led0/trigger
$ echo gpio | sudo tee /sys/class/leds/led1/trigger
Now you can control the LEDs with gpiozero like so:
from gpiozero import LED
from signal import pause

power = LED(35)
activity = LED(47)

activity.blink()
power.blink()
pause()
To revert the LEDs to their usual purpose you can either reboot your Pi or run the following commands:
$ echo mmc0 | sudo tee /sys/class/leds/led0/trigger
$ echo input | sudo tee /sys/class/leds/led1/trigger
Note
On the Pi Zero you can control the activity LED with this recipe, but
there’s no separate power LED to control (it’s also worth noting the
activity LED is active low, so set active_high=False when constructing
your LED component.
On the original Pi 1 (model A or B), the activity LED can be controlled with GPIO16 (after disabling its trigger as above) but the power LED is hard-wired on.
On the Pi 3B the LEDs are controlled by a GPIO expander which is not accessible from gpiozero (yet).